Saturday 30 December 2017

MERRY PATTERNS CHRISTMAS CARDS

I hope you are all enjoying the festive period.

I'm back to share some of the Christmas cards that I lovingly crafted for family and friends.

Today’s cards have been made using the Merry Patterns Stamp Set that was available from Stampin' Up! for a limited time, with a qualifying workshop order, during September and October .


Firstly, a card that was very quick and simple. I stamped the deer in Versamark ink and heat embossed with copper embossing powder. Then, I stamped the 'Merry Christmas' around the outside of the Whisper White square, using basic black ink. I mounted this onto a Night of Navy card base, but it would go well on lots of different cardstock colours.


The next card was even easier to make using a simple colour combination of Smoky Slate and Real Red. I got my inspiration for this cards after I saw a card on Pinterest by Helga Hopen. You can see her original card here.


My final card today is made using the branch stamp from the set, which I curved on the clear block slightly and stamped to create a wreath.


This stamp set is no longer available, but if you wish to purchase any of the other items used to make these cards simply click here to go to the Stampin' Up! Store. Be sure to select me as your demonstrator to receive a free thank you gift for shopping with me!


Tanya x


Email me - countrysidecrafter@hotmail.com

Follow me on Facebook - www.fb.me/suffolkstamper


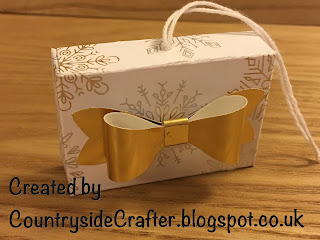
YEAR OF CHEER CHOCOLATE TREE DECORATIONS

Today I want to share with you some gorgeous little decorations I made to hold chocolates for the Christmas tree.


I have used the Year of Cheer Designer Series Paper from the 2017 Holiday Catalogue from Stampin' Up! which is no longer available (insert sad face).
I also used Gold and Copper foil sheets, the Bow Builder Punch and the Envelope Punch Board from Stampin' Up!'s Annual Catalogue.


Each little box holds two chocolates (one of each of these). They are a sharing treat, I told my children they can only take a chocolate from the tree if they have someone to share the other chocolate with.


If you wish to purchase any of the items used to make these decorations simply click here to go to the Stampin' Up! Store. Be sure to select me as your demonstrator to receive a free thank you gift for shopping with me!


Tanya x


Email me - countrysidecrafter@hotmail.com


Thursday 14 December 2017

SOMETHING NEW

Welcome back! 
I have been busy preparing for the festive season and it has been exhausting!! I needed a little time out of Christmas preparations, so I have been creating items not in the theme of Christmas.


As a Stampin' Up! Demonstrator I am lucky enough to be able to order early from the up-coming Spring/Summer Catalogue, which will be released in the new year, and the Sale-A-Bration promotion which starts on January 3rd (more details coming soon!). My pre-order arrived and I couldn't wait to try out some of the amazing new products (as well as some of my favourites from the Annual Catalogue).


Firstly, a card that uses the Flying Home Stamp Set. I love these cute little bird houses! The stamped image has been coloured with Stampin' Up!'s NEW Stampin' Blends which are the most amazing alcohol markers, I don't consider myself to be the best at colouring, but these markers make it so easy.


Next, I have a card that uses some of the gorgeous Picture Perfect Party DSP and the Picture Perfect Birthday Stamp Set, which is photopolymer, making it easy to see where you are stamping and allowing you to create a shadow effect.


My next card uses just the Stamps to create this clean and simple card, with a bit of sparkle from Gold Glimmer Paper and Gold Mini Sequin Trim.


I continued with the Picture Perfect Birthday Stamp Set and the Picture Perfect Party Designer Series Paper on this scrapbook page of my daughter's 7th Birthday.


Finally, I have 2 projects to show you using mainly items from the Annual Catalogue.

Firstly, this gorgeous little box that holds a miniature bottle of wine, perfect for a small token gift. This box uses an A4 piece of cardstock and has gusseted sides (at the top) and a tab closure.


And finally, this beautiful canvas that is going to take pride of place in my crafting space. I have used the Embossing Paste (With a few drops of Smoky Slate Ink Refill), Pattern Party Decorative masks and Crafting Forever Stamps from the Annual catalogue, which I again coloured with the NEW Stampin' Blends.


Phew! A whistle stop tour of this week's creativity! Pop back next week when I will share my template for the miniature bottle box with you.


If you wish to purchase any of the items used to make these cards simply click here to go to the Stampin' Up! Store. Be sure to select me as your demonstrator to receive a free thank you gift for shopping with me!


Tanya x


Email me - countrysidecrafter@hotmail.com

Follow me on Facebook - www.fb.me/suffolkstamper


Monday 11 December 2017

NIGHT IN BETHLEHEM CHRISTMAS CARDS

Welcome back! I have been busy preparing for the festive season and it has been exhausting!!

Over the next few days I will be sharing some of the Christmas cards that I have lovingly crafted for family and friends.I love Christmas and love everything in the Stampin' Up! Autumn/Winter catalogue.


Today's cards have been made using the Night in Bethlehem Bundle #146043 (Wood-mount) #146044 (Clear-mount)


Firstly a card that uses both the stampset and the dies in the bundle. Stampin' Dimensionals really help to give the card some depth and really shows off the die cut elements.


Next I have a card to show you that I mass produced (36 cards to be exact) to give to the children in my class at school. We are a church school, so I felt this stampset would be perfect.


On Whisper White cardstock I sponged the background in Marina Mist, Dapper Denim and Night of Navy. I stamped the stars in Craft ink and added Dazzling Diamonds Glitter #133751. Then I stamped the figures in Basic Black ink. Finally I mounted this onto a 3x3 card in Night of Navy, cut to fit the Whisper White 3x3 envelopes in the Autumn/Winter catalogue #145829.


If you wish to purchase any of the items used to make these cards simply click here to go to the Stampin' Up! Store. Be sure to select me as your demonstrator to receive a free thank you gift for shopping with me!


Tanya x


Email me - countrysidecrafter@hotmail.com

Follow me on Facebook - www.fb.me/suffolkstamper


Saturday 14 October 2017

CRAFTY INKLINGS 5TH BLOG HOP


Welcome to The Crafty Inklings 5th Blog Hop.


We are a group of fellow Stampin' Up! Demonstrators from Norfolk, Suffolk and a bit beyond, who regularly get together for team events and to share our love of crafting. We are a small number of participants this month but we still have an exciting blog hop for you. Our theme is 'Deck the Halls', so we are all sharing home décor projects.

Depending on where you have started from, you may have just joined me from Sandra's blog and enjoyed her amazing creation. 

Today I am sharing with you a beautiful and simple festive decoration. I am showcasing the 'Night in Bethlehem' Bundle (#146044 clear mount / #146043 wood mount), which I think is just gorgeous and makes a perfect festive decoration, with the addition of a battery operated tealight. 


This can also be made as a card, by omitting the bottom piece of card, or you can do as I have and add a fold line in the bottom piece, allowing it to fold and fit into a C6 envelope.


I hope you have enjoyed my tealight decoration. You can continue on 'hopping' by clicking here to go to Jacqui's blog to see her beautiful creations.

Here is a list of all participants (with links):


Sandra
Tanya (That's me!)
Jacqui
Cheryl
Barbara

If you wish to purchase any of the items used to make these projects, get in touch using the contact details below and I will get a Holiday catalogue to you. For current products click here to go to the Stampin' Up! Store. Be sure to select me as your demonstrator to receive a free thank you gift for shopping with me!

Tanya x


Email me - countrysidecrafter@hotmail.com

Follow me on Facebook - www.fb.me/suffolkstamper


Tuesday 22 August 2017

LABEL ME PRETTY PACKAGING

I've got a quick blog post for you today to show you how to quickly and easily jazz up some plain and boring food/gift packaging.

A few weeks ago I attended an amazing macaron baking workshop at The Cupcake Oven in Manningtree in Essex. 


Since then I have been perfecting my macaron baking skills and gifting my bakes to family and friends, but the packaging was boring and so needed a little something.

I have used the Label Me Pretty stamp set and coordinating Pretty Label punch from Stampin' Up's annual catalogue, which are available as a bundle saving you 10%.

Label Me Pretty bundle Wood-mount #145304 £33.25 Clear-mount #145305 £27.75

I stamped in Berry Burst ink (to coordinate with the deep pink of the macarons) and punched out the label.


Behind the label I placed a piece of burlap ribbon and finished the label with a tiny heart punch from Stampin' Up!'s gorgeous Gold Glimmer Paper.


If you wish to purchase any of the items used to make this project, simply click here to go to the Stampin' Up! Store. Be sure to select me as your demonstrator to receive a free thank you gift for shopping with me!


Tanya x


Email me - countrysidecrafter@hotmail.com

Follow me on Facebook - www.fb.me/suffolkstamper


Saturday 19 August 2017

CRAFTY INKLINGS 4TH BLOG HOP

Welcome to The Crafty Inklings 4th Blog Hop.


We are a group of fellow Stampin' Up! Demonstrators from Norfolk, Suffolk and a bit beyond, who regularly get together for team events and to share our love of crafting.  Today we are sharing projects made under the theme 'Autumn/Winter' and you may well get a few sneaky peeks of items available in the up-coming Autumn/Winter Holiday Catalogue, which will be released on September 1st.

Depending on where you have started from, you may have just joined me from Sandra's Blog and enjoyed her amazing creations. 

Today I am sharing with you a few projects made with using a stamp set that will soon be available in the Holiday Catalogue. I am showcasing the 'Hug in a Mug' stamp set (#144933), which I think is just gorgeous and definitely fits the themes of Autumn and Winter. What better way to get warm and cosy during the extreme weather we experience, than with a steaming cup of hot chocolate (whipped cream and marshmallows optional!)

For my first offering, I teamed the stamp set with the new 'Everyday Label' punch (#144668) and the gorgeous plastic 'Treat Tubes' with cork stoppers (#144612) to create this little hot chocolate treat with tiny sugar star sprinkles.


My second project uses a lot of elements in the stamp set.


And the final card teams the stamp set with some gorgeous paper from the 'Quilted Christmas' 6”x6” Designer Series Paper (#144617) and Black Rhinestone Jewels (#144639), again both available in the new Autumn/Winter Holiday Catalogue.


I hope you have enjoyed the projects I have shared with you today. You can continue on 'hopping' by clicking here to go to Cheryl's blog to see her wonderful creations.

Here is a list of all participants just in case the in-text links don't work:
Sandra
Tanya (that's me!)
Cheryl
Becky
Sue

If you wish to purchase any of the items used to make these projects, get in touch using the contact details below and I will get a Holiday catalogue to you. For current products click here to go to the Stampin' Up! Store. Be sure to select me as your demonstrator to receive a free thank you gift for shopping with me!


Tanya x


Email me - countrysidecrafter@hotmail.com

Follow me on Facebook - www.fb.me/suffolkstamper


Tuesday 15 August 2017

BABY BEAR CONGRATULATIONS

Today I am going to share with you a card I made for some friends to welcome their gorgeous baby boy into the world and my foolproof way to get a perfect layered image with this beautiful stamp set.


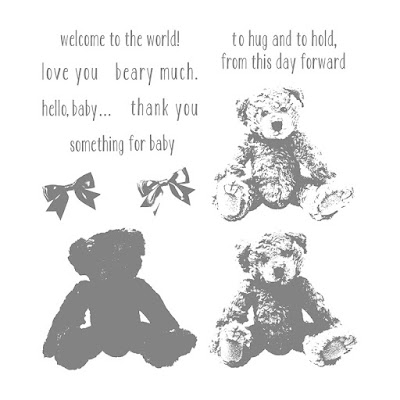
I have used the Baby Bear stamp set from Stampin' Up's annual catalogue, which is a three-step stamp.

Baby Bear #141859 £23.00


The 3D-looking bear image is made up of three stamps that you stamp over each other. I tend to stamp in a different order to the suggestion in the stamp set packaging.

First, I stamped the image labelled '2' in Crumb Cake ink.


Second, I stamp The image labelled '1' in Crumb Cake ink after first 'stamping off' on to a piece of scrap paper to get a lighter tone, using the bears underarms to help with lining up the image, which is so easy with the photopolymer stamps.


Thirdly, I stamp the image labelled '3' in Soft Suede ink.


Have fun experimenting and creating different looks with different colour combinations.

If you wish to purchase any of the items used to make this card, simply click here to go to the Stampin' Up! Store. Be sure to select me as your demonstrator to receive a free thank you gift for shopping with me!


Tanya x


Email me - countrysidecrafter@hotmail.com

Follow me on Facebook - www.fb.me/suffolkstamper